Quick Tip: Easy Manual LOG Grading
Music Courtesy of MusicVine.com Get 25% off your next music license with code C5D25 (valid for one use per customer)
If you get handed a drive full of LOG footage, you could of course slap on the respective camera LUT and be done with it, right? Of course you can do that, but it’s very easy to manually grade LOG video and that gives you much more creative control.
The purpose of using LOG gamma is to record as much of the Dynamic Range a camera sensor produces into the file that gets recorded to card. This file is a normal 8- or 10-bit file that is recorded in the camera’s codec and must not be confused with RAW data (which is a completely different beast).
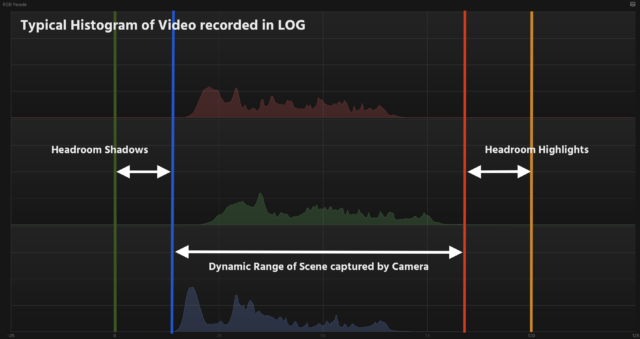
If you look at the image below you can see that the Dynamic Range of the scene is smaller than the Dynamic Range the codec could record. Thus leaving “headroom” below what was black in the scene (blue line) in front of the camera ad what was white (red line). In a way, the camera redistributes (squeezes) brightness values together towards the middle of the histogram.
If you put footage that has had it’s brightness values distributed on a LOG curve (like in the image above) into a timeline that expects blacks to be at 0% (green line) and white at 100% (orange line), then it’s perfectly clear that the “scenes blacks” are way above (and thus grey) the “timelines black” level and the “scenes whites” are way below “timeline white” (and thus light grey).
So basically all you need to do is to bring down the blacks and bring up the whites so that what the camera “saw” as black and white is where the timeline “expects” black and white to be. The midtones theoretically fall into place automatically, if the image is technically exposed correctly (18% grey exposed at 40 IRE).
We as Cinematographers
If we do not want to expose technically correct most of the time, we deliberately under- or overexpose the skin tones depending on the mood and look of the scene. That’s why the midtones have to be put manually where we want them to be.
Depending on how you lower the blacks and raise the whites you might need to add saturation to the image for it to look correctly. That’s it!
In order to properly convert or “normalize” footage so that it looks correctly, camera manufacturers provide LUTs (Lookup Tables) that can be applied to the clips inside an NLE and make them look contrasty and colorful again.
You can think of those LUTs as “frozen” color correction, so by design, those LUTs simply take an input value and “stupidly” convert it into an output value. If your footage is technically exposed correctly and you put on any old X-LOG to REC.709 LUT, your footage will look as if shot with a 709 gamma, but the LUT will not compensate if the material is accidentally or purposefully under- or overexposed.
8-Bit LOG files are generally soft and not as aggressive as their 10-bit counterparts. That means they need less shifting around brightness values and look almost normal to start with (Canon C-Log or DJI D-Cinelike for example), nevertheless they need the same adjustments that more aggressive flavours of LOG — just a bit less. That’s due to the fact that 8-Bit codecs “fall apart” very easily when you push them a bit too far. Thankfully 8-Bit codecs are finally on their way to the “happy hunting grounds” or wherever dead codecs go.
The Big Benefit of Manual LOG Grading
The benefit is that you keep complete control and can compensate for deliberate or accidental over- or under exposure to balance your image for editing or before you start your creative grade.
It’s a relatively easy process and you need to know only the basic color correction tools in your NLE and be familiar with a waveform scope.
You can correctly de-LOG footage by looking at your scopes without the need for a video I/O device and a display calibrated to your timeline color space. However, I really recommend getting the hardware for serious color correction work.
Additional Video Editing Quick Tips:
DaVinci Resolve Chroma Key on Color Page
DaVinci Resolve Basics of Using LUTs
DaVinci Resolve White Balancing
If you have thoughts, comments, or tips of your own, please put them in the comments. If you have an idea for a future Quick Tip Video, by all means, let us know!


