This is the second part of my series about working with camera cards in Apples Final Cut Pro X. In the first part I have covered the basics, now it’s time for some more nitty-gritty.
Copy? Rewrap? What Does That all Mean?
I have already explained in the first part of this tutorial that Final Cut Pro X will copy media off the camera-cards into its own storage location. While this is true it does not always make an exact duplicate of the files on the card.
Some file-formats like mpg4 from some Canon DSLRs are copied over as they are, but a lot of formats like Sony’s SxS or XQD cards or Canon’s XF-format are treated differently by Final Cut Pro X. Instead of copying the .mxf files those cameras write to their cards 1:1, Final Cut Pro X rewraps them to .mov files.
NOTE: Final Cut Pro X can import most MXF files directly for a while now. So if you import a single .mxf file FinalCutProX will not rewrap it. If you are importing from a card it will rewrap.
Rewrapping means Final Cut Pro X strips the mpg4 encoded video out of the MXF container file and puts it into a new QuickTime container. During this process, video is not re-encoded or altered, thus not degraded in quality.
This is an important fact to keep in mind!
Some camera formats — I have encountered this for example with video from the Fujifilm XT-2 camera — are imported (copied) into Final Cut Pro X’s current media location without rewrapping, but in the background Final Cut Pro X starts to automatically create Optimized Media.
That means it’s transcoding the mp4 to ProRes, thus increasing the storage requirements significantly! I’m not sure why Final Cut Pro X is doing that for specific files, rumor has it that it has to do with spanned clips those cameras produce.
If you have more info on that, please let me know and I’ll update the post accordingly.
You can stop that transcoding, if your machine is capable of coping well with the original camera media, by clicking the circle-icon in the top-left of the Background Tasks window (cmd+9 to reveal) and stop the creating of optimized media there.
If the optimized media has already been created you can select the Event (that has the media in it) in the browser and go to Menu/File/Delete generated Event Files tick Delete optimized Media and click OK to delete the ProRes representations of the clips inside that Event.
Camera Archives
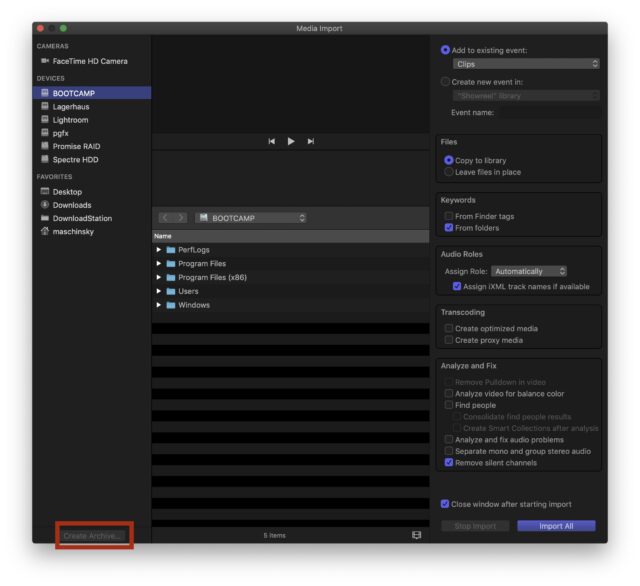
Instead of importing media off camera-cards straight into a library, you also have the option to have Final Cut Pro X create a camera archive by selecting a camera card that is connected to the Mac and clicking the Create Archive… button in the lower left of the import window.
Final Cut Pro X now creates a so-called bundle file, which is basically a folder that behaves like a single file but has all the files in it.
Its contents are hidden from the user, but can be viewed by right- or control-clicking its icon and selecting Show Package Contents…. Most Mac OS applications consist of such a bundle and a Final Cut Pro X library file is such a bundle, too.
Creating Camera Archives from cards is useful if you want to archive the card’s contents into a single easy to manage file, which is a bit-by-bit copy of the camera card. For example while doing DIT work on set.
TIP: I strongly suggest making a Camera Archive from every card first, before importing media into FCPX. This opens up interesting workflow possibilities. More on that in Part 3.
To import media from a Camera Archive into Final Cut Pro X, simply navigate to the archive file using the Import Media window, select it and you can choose which clips to import from it and even select ranges to import as if it was a physically attached camera card.
Backing up Camera Cards – Root Directories & Full Folder Structure
Copying camera cards to hard drives at the end of a shoot is common practice, but a lot can go wrong when this is not done properly.
Readers and disks are connected with USB or Thunderbolt cables, which can come loose or have a bad connection that can potentially corrupt files while they are copied. I therefore strongly suggest you use dedicated offloading-software like Hedge for Mac or Shot Put Pro. Not only do these utilities verify that all the data that has been copied is valid, but they also allow you to copy to multiple locations simultaneously to make two or more backups much faster than the finder can do it.
Both programs generate reports that act as proof that the data was copied successfully.
TIP: If you don’t want to spend your cash on dedicated offloading-software, there is another option: Blackmagic DaVinci Resolve (even the free version) has a feature on the Media page called Clone Tool (Resolve 15 manual page 233) that can clone camera cards using either CRC 32 or MD5 checksum verification.
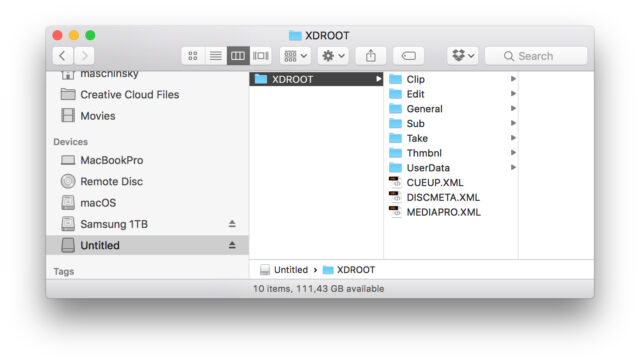
If you do not want to use a dedicated offload utility make sure to at least create a folder for every card you back up, name it appropriately and copy the card’s entire content into that folder lock, stock, and barrel and never to the root of the hard drive.
TIP: This is best done by option-dragging the card’s symbol on the desktop in the finder to where you want the card’s content to be saved. You should see a little green “+” next to the symbol you are dragging. Most cards are named “untitled” and the resulting folder on the desktop will be named “untitled” as well. You can safely rename that folder to anything you want.
Copying the complete card structure is very important because some NLEs can’t import footage properly from a folder that does not have all the metadata and folder structure in place. By copying everything off the card, it’s also less likely that you forget to copy a file or two.
TIP: That being said, if you get handed incomplete cards or “naked” camera clips somebody slapdashed onto a HDD , do not panic! Final Cut Pro X can import naked .mxf and .mp4 files from most sources. If ever you come across something Final Cut Pro X really can’t deal with, you can always resort to converters like the free FFMPEG or other third-party software.
Another benefit of having an exact duplicate of the camera card is the fact that it is possible to create Camera Archives with Final Cut Pro X from such a folder later.
To do that, open the Import Media window in Final Cut Pro X, navigate to the folder that contains the root content of the card. Select the folder that represents the camera-card in the bottom pane of the Import Media window . If the create archive… button at the bottom-left does not become active, you might have to click the disclosure-triangle next to the folder in the bottom-pane, forcing Final Cut Pro X to “look” into the folder and “realise” it’s a camera-card. That should make the button active and allow you to create a Camera Archive.
Disk Image Files
FCPX can create camera archives from camera cards that have been attached via card readers, but sometimes I get handed a drive with simple video-files backed up into a normal folder. For example files from an ATOMOS or BLACKMAGIC recorder. In this case it’s not possible to create a Camera Archive. But there is still a way to backup such “Camera Cards” neatly into one file, using the macOS Disk Utility.
You can find that little tool under Applications/Utilities/Disk Utility.
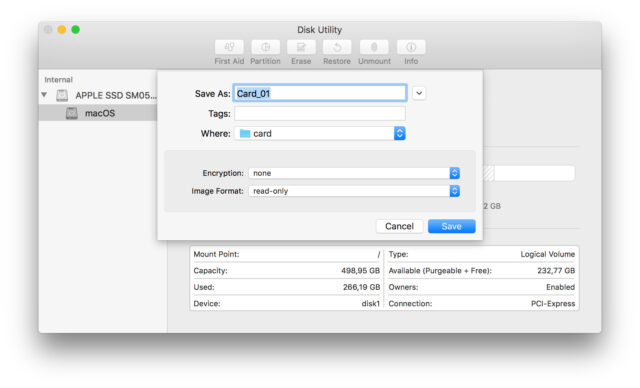
Launch it, pick File/New Image/Image from Folder… from the menu and enter a filename for your Disk Image. Below you have to navigate and select the folder that contains the root-content of your camera card backup. For Encryption select none and for Image Format set read-only. Click Save to start the process.
After finishing you will find a .dmg file at the location you chose. You can double-click this file to mount a virtual disk—which looks like a physically attached disk in the finder and to all other applications. You can import from a mounted Disk Image just like from any other device.
TIP: If that Disk Image is not an exact image of a camera card, you can import stuff into Final Cut Pro X and tick leave files in place, thus referencing files from that Disk Image. Just make sure the image is mounted next time you launch Final Cut Pro X, or its contents will be offline!
Unwanted LUTs on Previews on LOG Footage in Final Cut Pro X
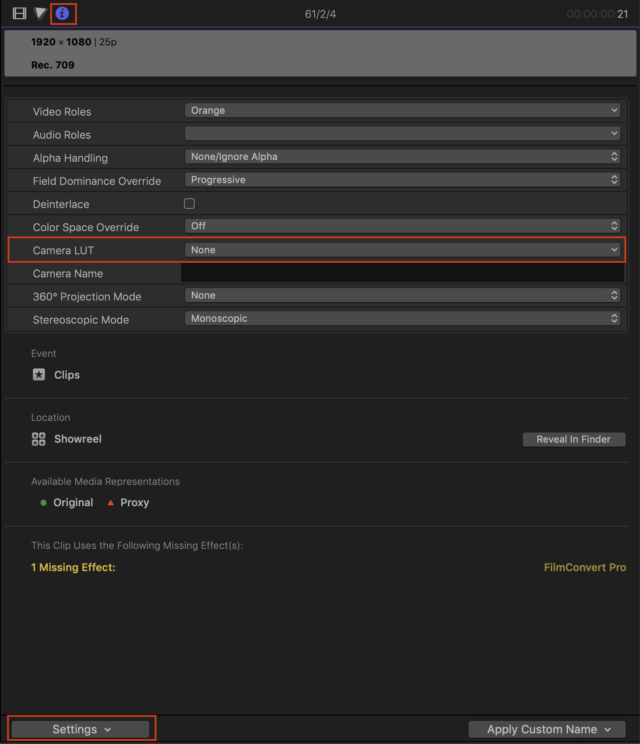
When importing LOG footage into Final Cut Pro X the NLE might automatically add a LOG to REC709 LUT on a per-clip-basis. So if you are sure as hell that you have shot LOG, but the clips look nice and contrasty as if you’d shot in REC709, it’s worth checking the inspector to find out whether Final Cut Pro X is the culprit who’s done that.
To deactivate this LUT, head over to the “i” info tab in the inspector, make sure you are viewing the Settings view of the inspector and set Camera LUT to None.
Alternatively, you could, of course, select any LUT that comes with Final Cut Pro X. To apply your own custom LUTs (.cube), import them via the Add Custom Camera LUT… command.+ in the dropdown menu.
Two down, one to go — that was it for Part 2! As always I’m grateful for feedback in the comments below. Also make sure to leave a comment, if you have any suggestions or ideas for other tutorials for Final Cut Pro X. Check back soon for the third and last part of this tutorial.
Until next time —happy editing!
