In this article, I want to share with you how to downsample 4K smartphone footage to create great-looking 1080p with minimal chroma sampling artefacts.
For any of you who follow me on social media or have seen my YouTube channel, you’ll know that I shoot a fair amount of video with my iPhone SE and iPhone 7 Plus. I color grade in Resolve as I would any other source footage, and the results have surprised me enough to keep me experimenting and pushing what can be done with well-exposed, well-shot video from a smartphone. These devices, along with the FiLMiC Pro app, continue to fascinate and impress me. I want to share as much of my findings as possible, and this is one of my techniques.
It’s known and accepted that down-scaling from a higher source resolution (such as UHD to HD) produces better looking, sharper, cleaner results when compared to footage originated natively at that resolution. There are many reasons for this, and the results differ depending on the method and math involved.
I will stop short of claiming that my results show true 1080p YCbCr 4:4:4 from YCbCr 4:2:0 4K source in order to save myself the online trauma which would no doubt follow.
I will, however, claim that the method you are about to learn will downsample 4K YCbCr 4:2:0 source files to 1080p YCbCr with better relative spatial chroma resolution and fewer artefacts than the 4K 4:2:0 source that is simply scaled to HD in an NLE.
Chroma Sub Sampling
Putting the effects of video compression (macro blocking especially) aside, let’s take a quick look just at YCbCr chroma sampling.
Hopefully you are familiar with discussions of 4:2:0, 4:2:2, and 4:4:4 chroma sampling. You probably know that 4:2:2 gives you more color information than 4:2:0, and that 4:4:4 gives you full color information. I’ve written about this before Getting to Grips with Chroma Subsampling, but for now we’ll look specifically at YCbCr 4:2:0 and YCbCr 4:4:4.
Color in post production is often spoken about in terms of RGB, but RGB is different to YCbCr. Video is usually encoded as YCbCr as it allows for luminance information (Y) to be separated from chroma information (Cb,Cr), and some of the chroma information to be discarded. Video is compressed by reducing the spatial resolution of the chroma channels relative to the luma channel – this can go unnoticed to the viewer and allow substantial savings in bandwidth.
Your smartphone is recording h.264 compressed video which is encoded as YCbCr 4:2:0. This means for every four pixel block of the image (two pixels vertical, two pixels horizontal), four samples of luminance information are recorded (one for each pixel), but only one chroma sample is recorded for all four luminance samples. This results in only 1/4 of the chroma information being recorded. Most of the time you don’t even notice this, but it is there.
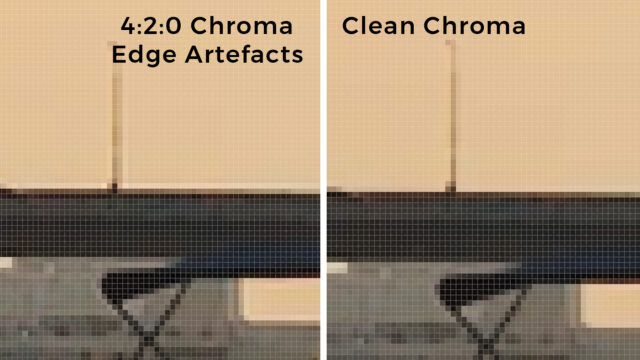
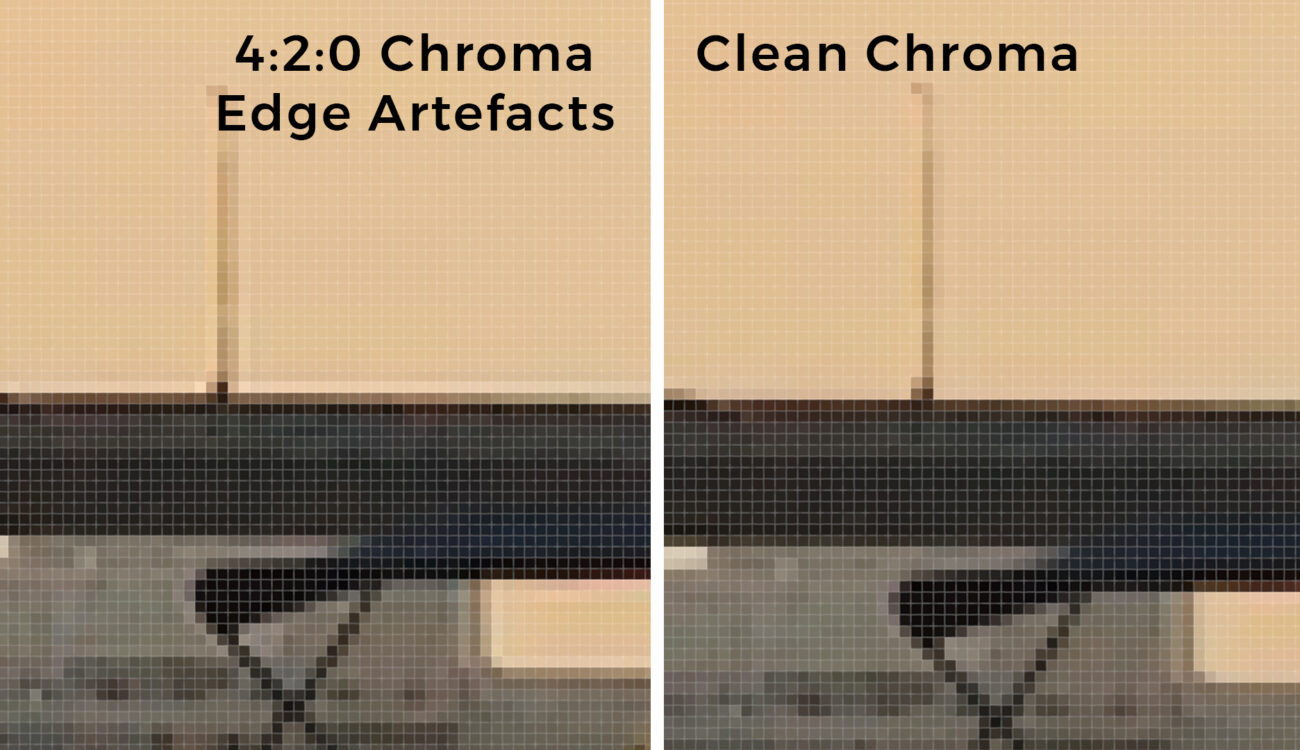
If you take a look around high contrast edges in a 4:2:0 encoded image you will see noticeable chroma artefacts, often appearing as a lighter or darker halo around the edge of objects.
Thankfully there is a way to remove these artefacts and improve the relative chroma fidelity of your smartphone-originated video by down-sampling the image by 4:1 and averaging the pixel values of each Y, Cb, Cr channel.
RGB vs YCbCr Downsampling
There’s no such thing as a free lunch, and you can’t magically get any more information out of a file than what is already in it. But if, like me, you’d rather have a great looking 1080p image than a mediocre 4K image, you can down-sample your 4K source to HD and make better use of the existing image information in the file. You can even out your ratio of luma and chroma samples, giving each pixel in your 1080p image one luma sample and one chroma sample. This is not interpolating or adding any information that isn’t already encoded in the original file, it’s just reassigning what’s already there.
However, not all downsampling methods and processes are the same, and not every application will give you the result I’m going to show you.
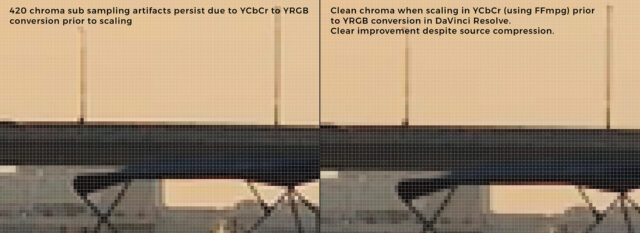
Left: DaVinci Resolve image scaling. 4:2:0 chroma sampling artefacts persist due to YCbCr to YRGB conversion prior to scaling. Right: Clean chroma when down sampling in YCbCr 4:4:4 prior to YRGB conversion.
For instance, DaVinci Resolve and many NLEs convert all source media to RGB (or YRGB) before any operations take place. In this case, the chroma sampling and resulting artefacts are baked into the YRGB image before scaling, so Resolve and most NLEs cannot be used to change the ratio of luma and chroma samples. Artefacts will remain.
The key is in making sure the scaling happens in YCbCr not in RGB. This is where FFmpg comes in.
Introducing FFmpeg
FFmpeg is a very powerful open-source video framework, you can find out everything about it here.
“FFmpeg is the leading multimedia framework, able to decode, encode, transcode, mux, demux, stream, filter and play pretty much anything that humans and machines have created. It supports the most obscure ancient formats up to the cutting edge. No matter if they were designed by some standards committee, the community or a corporation. It is also highly portable: FFmpeg compiles, runs, and passes our testing infrastructure FATE across Linux, Mac OS X, Microsoft Windows, the BSDs, Solaris, etc. under a wide variety of build environments, machine architectures, and configurations.”
Processing video files through FFmpeg gives you full control over exactly how operations take place. However, unless you are a developer, it’s not very easy to use.
Thankfully there is iFFmpeg.
iFFmpeg
iFFmpeg provides a GUI front end to the FFmpeg framework. You can find out more and purchase iFFmpeg here. It costs €18.50 but is worth every penny and will likely solve all kinds of other workflow problems when you need tight control over transcodes or format conversions.
I use iFFmpeg to downscale 4K YCbCr 4:2:0 source files to 1080p YCrCb Apple ProRes 4444 with better relative chroma resolution.
Let’s break it down.
Source Image Resolution: 3840 x 2160 pixels
Source Luma (Y) Samples: 3840 x 2160
Source Chroma (CbCr) Samples: 1920 x 1080 (each sample covers 4 pixels)
When each 3840 x 2160 resolution channel is down-sampled by exactly 4:1 using a process of averaging the result is:
Downsampled Image Resolution: 1920 x 1080 pixels
Downsampled Luma (Y) Samples: 1920 x 1080
Downsampled Chroma (CbCr) Samples: 1920 x 1080 (each sample covers 1 pixel)
I choose ProRes 4444 so that I don’t again discard chroma information with 4:2:2 encoding. The 4:1 averaging results in equal, 1920 x 1080 spatial resolution in all three Y, Cb and Cr channels, and the only way to keep that is with a 4:4:4 encoding.
How To Down-sample 4K Smartphone Footage with iFFmpeg
Here’s how to set this up in iFFmpeg.
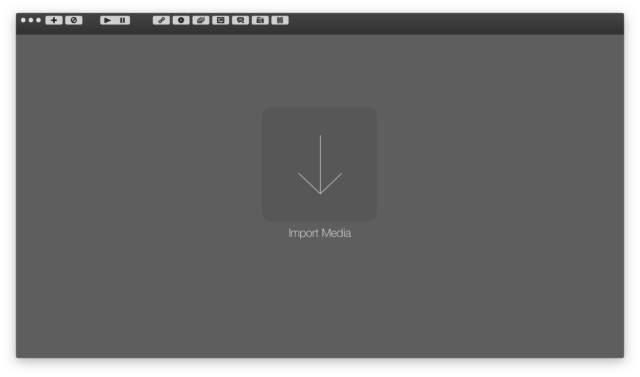
Step 1. Launch iFFmpeg
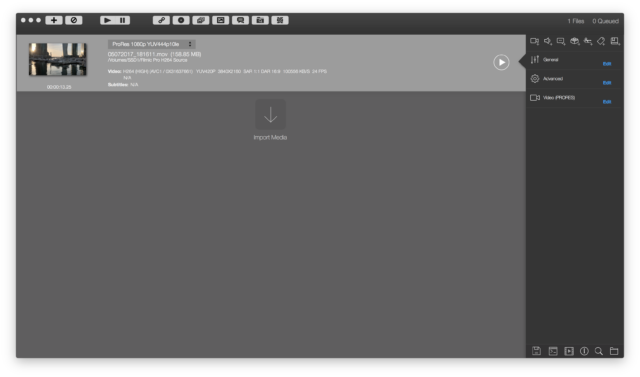
Step 2. Drag and drop original 4K source file(s).
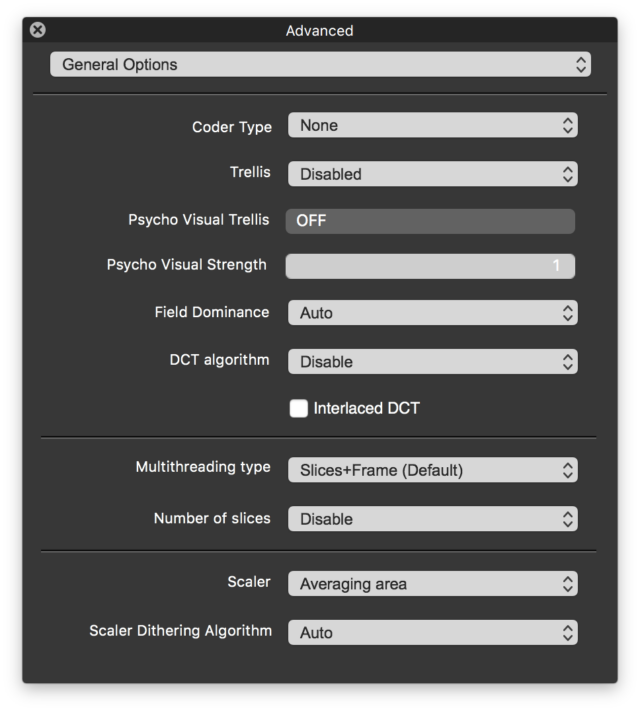
Step 3. Set up correct scaling parameter. Click “Edit” next to “Advanced” in the right hand side panel. From the pop-up dialog, select “General Options” from the drop down menu. Important: Select “Averaging Area” from the “Scaler” drop down menu. Close the dialog.
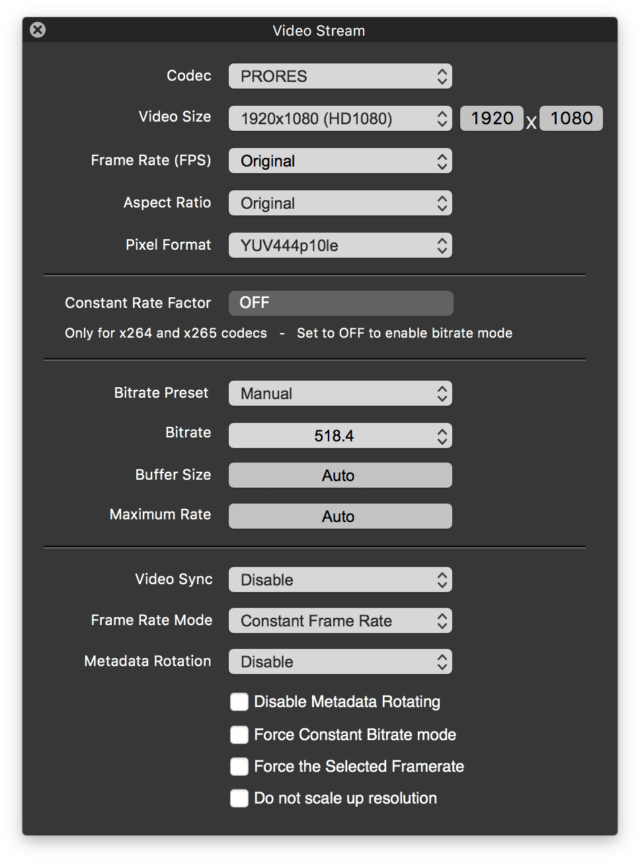
Step 4. Set up correct encoding parameters. From the main screen, click “Edit” next to “Video” in the right hand side panel. From the pop-up dialog, select “PRORES” from the “Codec” drop down menu. Important: Select “YUV444p10le” from the “Pixel Format” drop down menu. Close the dialog.
Step 5. Set destination folder and file name for each clip in the queue. From the main screen, click the folder icon in the bottom right corner of the right hand side panel.
Step 6. Run the transcode. When each clip in the queue has been correctly set up, click the Play button in the top bar of the main screen to begin transcoding.
The resulting files will be 1080p Apple ProRes encoded in YUV 444 10-bit with none of the chroma sampling artefacts of the original 4K 4:2:0 files.
Why encode to 10-bit when the source is clearly 8-bit? I believe – and I admit that I could be wrong about this, as I am not 100% sure – that four 8-bit pixel luminance channel values (ignore the chroma channels for now) can be averaged into a single 10-bit value.
Here’s an example.
Pixel 1 (luma channel only): 213
Pixel 2 (luma channel only): 212
Pixel 3 (luma channel only): 211
Pixel 4 (luma channel only): 213
Average value: 212.25
Obviously, if we are outputting a 8-bit encoded value, 212.25 is impossible since we only have values between 0 and 255. It is simply rounded down to 212.
However, if we are averaging into a 10-bit space and outputting a 10-bit encoded value, 212.25 is recorded as 849, where 212 is value 848.
That’s controversial and, even if it’s true, it is only true of the luma (Y) channel, not chroma… Cb,Cr channels will only ever be 8-bit. My understanding could be over-simplified, but right now until proven differently, I choose to encode into 10-bit just in case. I have nothing to lose but a bit of storage space.
Again, in regards to chroma resolution, I am not claiming this method produces perfect YCbCr 4:4:4 chroma-sampled files, and this is because of the h.264 compression and macro blocking of the source files. However, my tests show that even compression artefacts are minimised after down-sampling in this way, especially when the source is recorded at a high bit rate (100Mbps in this case).
Is it worth the extra trouble?
I’ve read many arguments for and against this kind of math on many forums, and am aware of the flack I could get for putting this up here, but I know the results I’ve had with it and I have checked it all with a leading color scientist who shall remain anonymous, but who does work for one of the leading manufacturers of digital cinema cameras. He’s an awful lot smarter than I am when it comes to this, and if he’s okay with it, then I’m okay to stick my neck out here and give you my findings and method.
If all you are going to do is upload to YouTube, then you’re going to drop back down to 4:2:0 in any case. I have not done any visual comparisons yet to see if there’s any perceivable difference on YouTube or Vimeo between original source files with 4:2:0, 4:2:2 or 4:4:4 chroma encoding. I doubt that there is any noticeable difference after online compression.
If, however, you are mastering for anything else, such as a short film or feature you’ve shot with a smartphone that may be shown at a festival via DCP or that you might provide to anyone needing a high-quality master file, then I believe it is worth the extra time and effort.
In the end it’s up to you. I would rather shoot high bit rate (100Mbps) 4K and downsample to cleaner, sharper, better-looking 1080p for post and delivery, than deliver 4K that looks like it’s been shot with a smartphone.
I’d love to hear your thoughts, ideas and even skepticism about this. Please weigh in your thoughts in the comments below.
