It’s 2025, and it’s time to get organized with the help of Swedish company CRDBAG. On the surface, you may think this is another review about pouches and tags (and you’d be partially right), but it’s also about better protecting expensive equipment and optimizing your on-set workflow. We all know time is precious and, of course…money.
Problem: The day-to-day act of image-making involves moving hundreds of tiny pieces of expensive (mostly matte black) accessories back and forth. Lose one, and a camera may not record or power on. A monitor may not work. The list of complications goes on.
In addition to writing for CineD, like many in this business, I wear multiple hats. I have a small production company, work freelance as an ICG Local 600 DP, direct, and produce. Often, my day-to-day work includes supplying equipment to multiple productions, which can be spread out over a large region. Other days, I’m traveling internationally and don’t have the luxury of redundancy. On those days, it’s vital a piece of technology doesn’t go amiss or fail in the field. I am in a terrific network of freelancers who help me make all of this work. We hand off camera and lighting packages back and forth and depend on each other to make sure these packages work. Keeping track of all these bits from various brands can be tricky. Loss & Damage happens on occasion, and it can be costly, especially for small companies like mine.
No matter what type of set you’re working, you have to adapt quickly (and safely) as the needs of the project change. The best camera and G&E departments I’ve worked with all make it feel like everything is part of the plan. This is not some fluke or coincidence. Those departments deploy great planning and have solid organization systems. While not the flashiest of topics, this is what made me want to highlight the team over at CRDBAG.

It took me a little bit to navigate the CRDBAG website and really figure out which items are best for which purpose – hopefully, in reading this article, I’ll save you a bit of research time if it seems their system could assist your work in a similar way to mine. Losing time hunting for tools could cost you the time needed to make a better image, so streamlining that process is actually something worth spending time considering. Even if you think you already have a fairly good system in place, it could probably be better. Now, let’s talk about bags.
Getting started
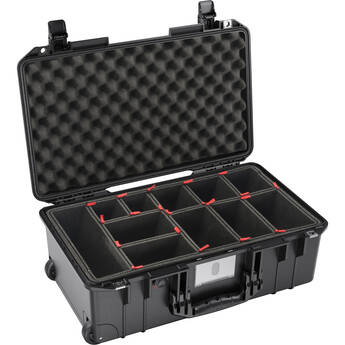
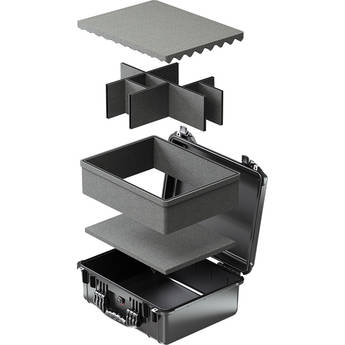
I initially purchased a batch of CRDBAG organizer pouches, embroidery patches, label windows, a NIIMBOT label maker, and various Y-wraps during the Black Friday sale and then additional bags from my go-to retailer, which is B&H. My initial goal was to outfit a 1535 Pelican Air and Lowepro ProTactic BP 450 AW III Backpack into perfect run-and-gun filmmaking packages that I could then expand outwards to my other kits as I nailed down what I liked.
In full transparency, I am also using the terrific TrekPak divider system in my Pelican 1535 case, but that’s a subject for another article. For those who don’t know, the Pelican 1535 air is 40% lighter than the airline travel famous Pelican 1510. That lower weight is a meaningful thing while lugging it around the world on airlines with varying carry-on weight limits.
My primary goal in all this is not cost saving but efficiency and ease. CRDBAGs, Pelican 1535, TrekPak, and even the Lowepro Backpack are all in the premium pricing category. (Yes, I know this.) However, those who store camera bodies or lenses worth thousands of dollars in the cheapest possible options clearly have different priorities and values when it comes to gear than I do. I’m considering this mini-organization project as an equal investment to buying a tripod. Ideally, all of this work lasts for years and can even outlive the life cycle of the cameras and kit I’m storing.
I acquired most of my lesser storage for free at trade shows or events. Who doesn’t love swag? Some were shipped as part of a product purchase. For example, my wide variety of Tentacle sync products all live in the plastic pouches they came in. I love all my Tentacle sync timecode and audio devices – I dislike all the bags they ship in. This isn’t a knock on Tentacle as a company. They make a killer audio product and never touted themselves as a great bag manufacturer.
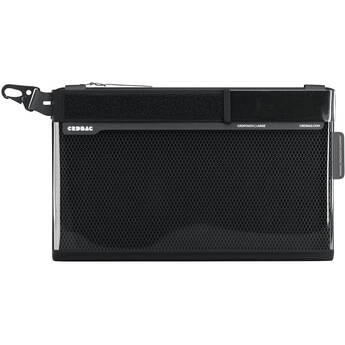
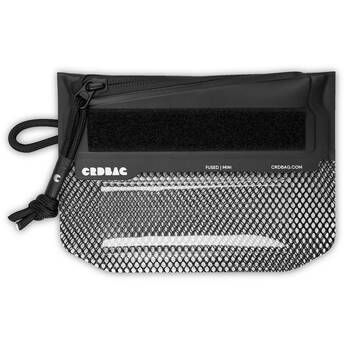
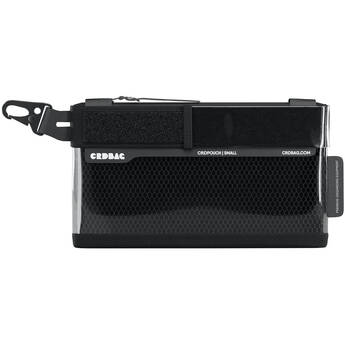
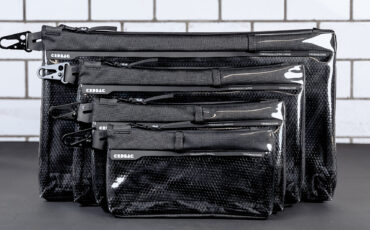
CRDBAGs are each made from nylon, e-Hypalon (a type of synthetic rubber), an aquaguard zipper, and mesh film. They come in the following prices, sizes, and dimensions:
- Mini: 166 X 120 mm (6.5″ X 4.7″) – Price: $19.90
- Small: 15 X 23.5 X 0.5 cm (5.9″H X 9.25″W X 0.2″D) – Price: $32.50
- Medium: 18.5 X 27 X 0.5 cm (7.28″H X 10.6″W X 0.2″D) – Price: $34.75
- Large: 23.5 X 32.5 X 0.5 cm (9.25″H X 12.79″W X 0.2″D) – Price: $39.75
- Extra Large: 28 X 44 X 0.5 cm (11″H X 17.3″W X 0.2″D) – Price: $42.25
Note: CRDBAGs occasionally do go on sale. These prices are current at the time of writing this review.
The bags remind me a little bit of wetsuit material, seemingly rugged enough to last forever. There is not a ton of padding, but these bags do provide your accessories with a basic measure of protection from sand, dust, scratches, and general bumps. One of my favorite design elements is the Velcro spots for labels and the additional slide-in label spots. The mesh front also allows you to see what’s in the bag before taking the time to unzip it.

Label time
The NIIMBOT label maker (CRDBAG sells these) has tape rolls that are exactly the correct size for the slide-in labels that CRDBAG makes. They also use a thermal “ink” system, so there’s only one expendable you need to keep stocked to make your labels. I found the NIIMBOT label maker easy to use. Ordering new rolls of compatible stickers is also easy through the free app on iOS or Android. Sourcing your own NIIMBOT label rolls from a different website? You’ll want the 20 x 75mm size for the most compatible look and fit.

If you have fond memories of being any kind of trooper or scout, you could absolutely make your own Velcro-compatible embroidered labels, but CRDBAG sells a variety of compatible labels with names for everything. See Audio, Battery, Media, Wireless, Cables, and other popular categories of kit. For me, I would use the Velcro label to narrow a bag down to “Battery” and then make a custom label to further narrow it down to “Core SWX Nano for Canon,” etc.
Sizing
Start making different packages with each of the CRDBAGs, and it all adds a level of professionalism to rented-out kits. It also makes prepping camera packages faster when you are handing a list of a dozen different pieces of kit that need to go out the door with a quick turnaround.

I initially struggled with wrapping my head around what items worked best in the different bag sizes. Here’s a list of all the bags again with the content that works best from my kit:
- Mini: Extra USB C Cables or Camera Media Cards or RED Multi-Tool
- Small: Canon C Series Monitor, Single 1:1 Wireless Go II from Rode Kit
- Medium: Single 1:1 TX/RX Audio Kit from Sennheiser or Sony or several Sony NP batteries
- Large: Sony Handheld Mic and Receiver w/XLR Cable or Teradek 1:1 Wireless System with Cables
- Extra Large: Core Nano X Batteries x4 with Micro Quad Charger Kit or Deity Smart Slate
Obviously, we all own different bits of kit, but hopefully, this will give you a sense of how these could work with similarly sized bits and pieces from your own bags and cases. Of course, it’s always best to take the dimensions and do your own measuring before making your investment.
Outfitting my Pelican 1535 Air

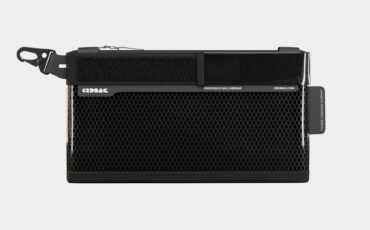
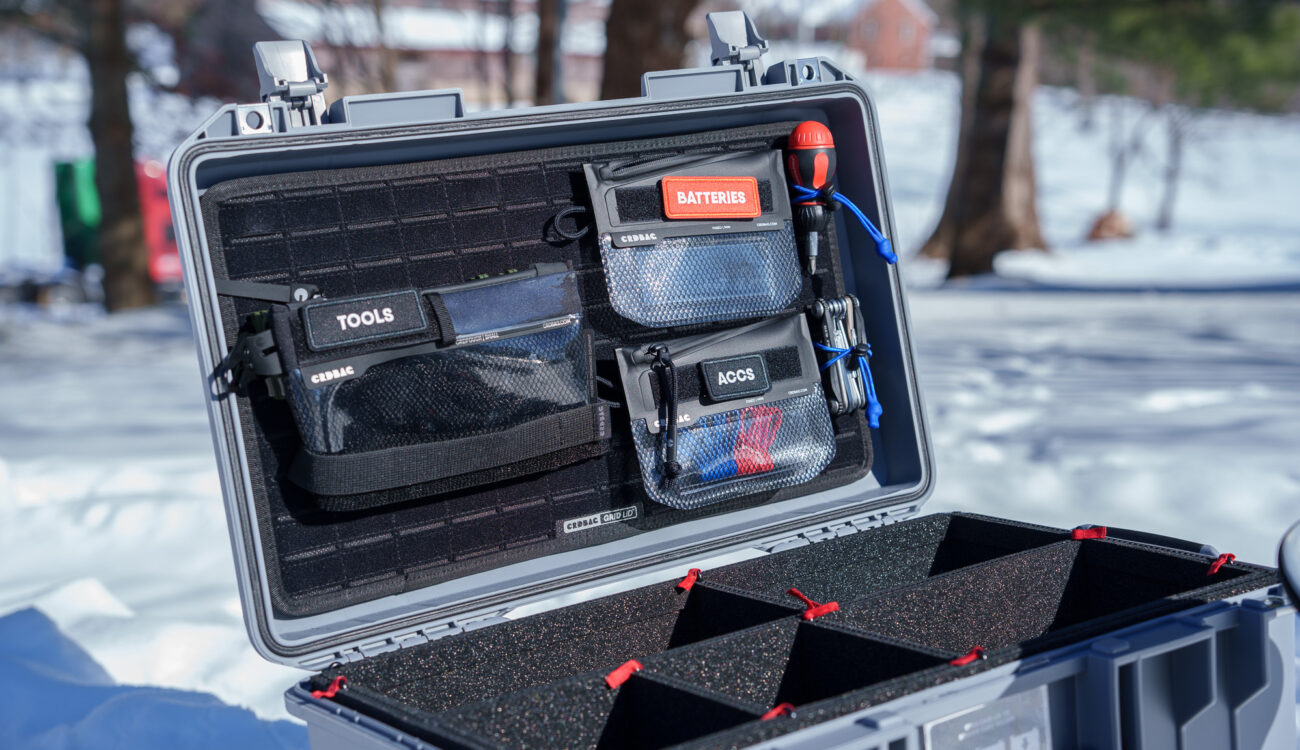
Everything starts with the CRDBAG Grid-Lid Carry-On. This converts the lid of my Pelican 1535 into a Molle / PALS-friendly system. Molle and PALS (initially developed by various militaries) allow for a universal attachment system for various accessories. The Grid-Lid Carry On also works for the following cases: Pelican/Peli (1510, 1535, V525), Nanuk 935, HPRC 2550W, MAX 520, SKB 2011, TAF CASE 501M.
CRDBAG also makes two lights that attach to the Grid-Lid, for which I particularly geeked out. (This is so handy for working on dark sets.) More on both lights in a moment.

For me, I found the small bags fit in a quad format in the lid. Alternatively, you could use the mini size and leave a little room for the light or a tool or two. From where I sit, the “small” size CRDBAGs are really what you want to use with the Pelican 1535 in general because anything larger means the bags can’t sit in a row and would need to sit flat.
The medium bags do fit in the Pelican 1535, but the way the lid lands means you will need to squish them slightly to close the case (something to keep in mind).
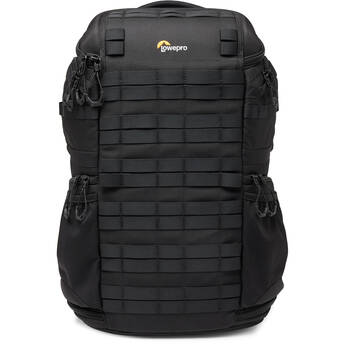
Outfitting the Lowepro ProTactic BP 45 AW III Backpack
My favorite backpack for mobile filming, the Lowepro ProTactic BP 450 AW III, fits several DSLR bodies or Cine lenses along with a Sony FX3/Canon C80-sized body. In either scenario, various accessories snuggle nicely in there, too. It is also possible to squish a Canon C300MKIII or a Sony FX6 in a broken-down configuration with a mid-range zoom inside when needed.

I’m now most interested in that Molle webbing right on the front because it is the perfect width for a few CRDBAGs in Small and Medium sizes. I go back and forth on what I prefer in these bags, but usually, smaller Sony or Canon batteries, a screw-on polarizer, and a case with blank media are most useful for a shoot with this bag.
If you are working in a DIT role, you could put a 16″ laptop in the backpack sleeve and affix various cables and adapters to the bags in the molle webbing.

Other Lowepro ProTactic BP 45 AW III Backpack features to consider:
- Dual side doors for easy interior access
- Rain Cover (in a contained pouch that assembles in seconds)
- Tripod Pocket (a smaller one can also fit on the side of the backpack)
- Comfy Top Straps (We all know the importance of cushy shoulder support for remote shooting-no digging in like a few brands I’ve tried.)
Y-Wraps
I would be remiss if I didn’t spend a little time on the Y-Wraps in this review. A Y-Wrap is essentially a padded equipment wrap intended for a single lens or camera body. I’ve also used these to protect a 5- or 7-inch monitor. They work well as an additional layer of padding for items stored in a backpack or hard case. These tend to be best to avoid impact from other pieces of tech bumping against each other and preventing scratches. I personally liked using them with my Teradek transmitter and receivers, which have antennae that are difficult to remove.
If you have used other equipment wraps like this, you know they tend to be bulky with a lot of excess material, taking up valuable real estate in your kit. With these, you can wrap up your lens or camera body, tighten it, and then label the wrap with the same-sized labels used in the bags.
The Y-Wrap comes in small ($19.90), medium ($23.90) and large ($25.90) sizes. The small wrap will protect a small zoom (typically paired with Mirrorless bodies). The large will cover a Canon C400 body!
Again, these aren’t meant to be standalone protection solutions, but they do add a little more peace of mind inside a BP 45 AW III Backpack or a Pelican 1535. Be vigilant when TSA or airport security agents start unwrapping your gear like it’s Christmas, though.
Full Brick and Half Brick

In addition to the “classic” CRDBAG lineup, the company also recently introduced two brick style bags. I’ve found these to be very useful for larger camera batteries or camera AC power adapters — really any item that tends to benefit from the extra width afforded by the brick style of bag.
These bags lack the MOLLE and PALS interface of the classic CRDBAG, but maintain a velcro spot and slide-in label slot. As of publishing, the half brick is priced at $19.90 and the full brick lands at $24.90.

During testing I found that a good mix of the classic bags and bricks is the way to go for my particular blend of film equipment.
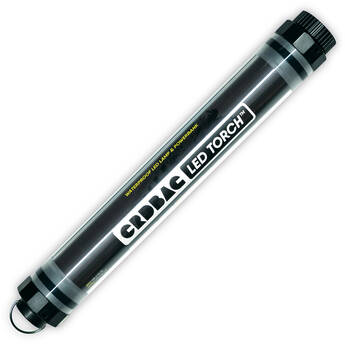
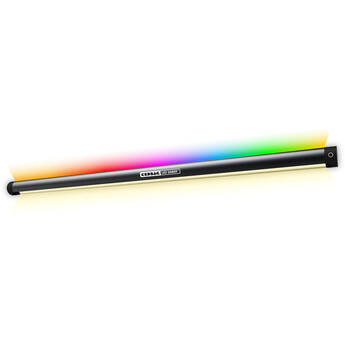
LED Torch versus LED Saber
CRDBAG also makes two types of LED lights called the Torch and the Saber, and I was initially a bit concerned by this (does everyone need to be in the LED lighting game?) until I started looking at these as simple tools to make your on-location life easier. Most of my headlamps are too directional and I actually prefer the wider beam angle of both the Torch and Saber lights for help breaking down after a long production day.
The Torch ($59.90) is a bit wider than the Saber and features a built-in 5200mAh power bank and a fixed 5500K color temperature with three brightness settings that step up and down with a simple button press. It’s also waterproof and has an IP68 rating (when the cap over the USB ports is screwed down, of course). Fully charging the Torch takes about four hours.
The longer and thinner of the two, the Saber ($49.90), has an attached USB-C cable and comes with a little stand for placing the light vertically at your workstation. The Saber has no internal battery but has RGB and Bi-Color options. No IP rating to speak of, though. I don’t look at the Saber’s lack of internal battery as much of a negative because I always have some kind of camera battery or phone battery around with a USB-C port.
Both the Saber and Torch require a “light lock” accessory to mount to a Molle system, or you could use a couple of CRDSTRAPs in a pinch. If I had to pick a favorite, I might lean toward Torch here, as I love the rugged build and IP rating. In the case of the Saber, I might most often use the Bi-Color or red settings (to reduce light spill onto the set). That means I’m not getting the most use out of the Saber.
Either way, these lights are slightly different, and you might find the lower-profile Saber to be the most useful one for your workflow. Hats off to CRDBAG for creating two unique lights in a busy, busy LED space.
Final thoughts

My random assembly of storage solutions is steadily morphing into a system that looks good and saves me time. I also recommend adding Apple AirTags onto high-value equipment for added peace of mind, especially with high-volume rental houses or quick turnover. Utilizing an asset tracking service like Cheqroom for another layer of asset tracking is also a game-changer. For moisture reduction, desiccant packs get the job done. HERE are my favorites.

One of the only CRDBAG products I didn’t get to test during this process was their wall mounting system, which is quite clever for an equipment room or storage unit. I’ll have to save that for a future post.
Like with most Film & TV kit, you get what you pay for. While CRDBAGs are on the pricier side, my hope is that this investment of time and money will support my shoots for years to come.
Are you aiming to get more organized in 2025? Would you add CRDBAG products to your kit? What solutions are you using now? Let us know in the comments!