This is the first post in a short series for absolute beginners who want to get started in DaVinci Resolve. First off, we’re going to discuss workflow concepts.

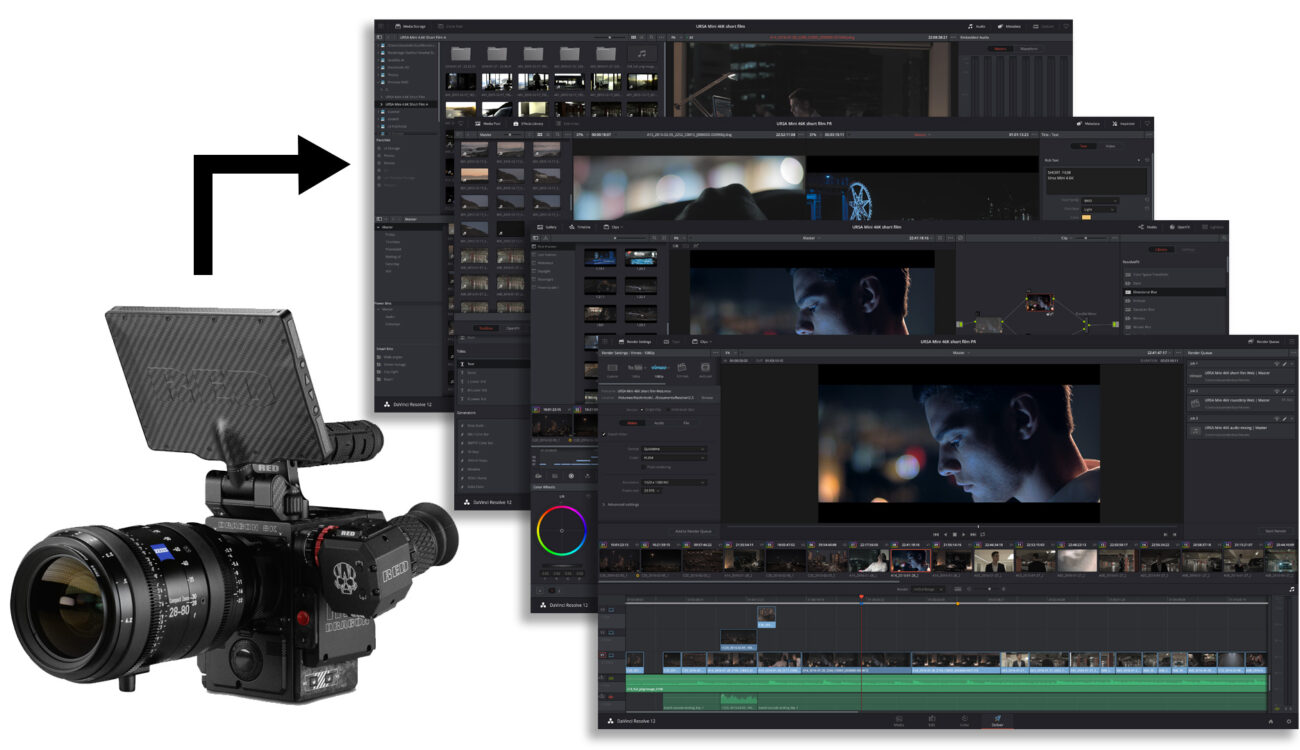
A “native” workflow in DaVinci Resolve where camera media (R3D in this example) is used through all stages of post, and in a single application.
Get Started in DaVinci Resolve
For those of you that are cinema5D regulars, or anyone who knows me from my blog or social media, you’ll know color is something I spend a lot of time explaining, teaching, as well as doing. I love colour: the art, the science, physics and effects on human perception and psychology as it relates to our experience of story. I was recently accepted as a full Colorist Society International member. There are a lot of experts in the field online, and they are all good, so soak up everything you can read and watch online. This short series will be both conceptual and practical with the aim of getting you off to a good start in Resolve using the same concepts and methodology as a professional colorist.
What is workflow?
What do we mean when we talk about workflow?
A workflow is simply a process, or set of defined steps that will take you from where you are, to where you want to be. It’s a repeatable set of instructions to get from A to B.
We talk about workflow mostly in the context of post production, and there is also on-set workflow in terms of data management and any number of processes that may happen on set. In the end, it’s all the same workflow: what takes place on set and what takes place in an editing bay or color grading suite is just a matter of location.
Why is workflow important?
A defined workflow allows a high level of control over how things happen, when they happen and what the results will be.
- A workflow ensures consistency, and ultimately, the quality of the final product.
- It ensures that technical standards are met and maintained.
- It simplifies and defines the process into steps that every person involved understands and acknowledges.
- It ensures problems can be identified and solved quickly.
Breaking down an example post production workflow
A workflow is designed and customised for a particular job and there are as many possible workflows as there are jobs. There are, however, some basic starting points. I’m not going to list them all or describe them all, my purpose here is to explain what workflow is, so that you are better equipped to approach your own projects in a logical way. For those of you that are already familiar with all of this, the example I’m about to give is simplified, but it should help those who are new to this entirely.
One possible workflow in the context of editorial and finishing, is a round-trip workflow. Let’s say we’re working on a film or commercial which has been shot with a number of RED cameras in REDcode RAW. I want to edit this on my laptop, but I don’t have storage space or the performance required to work with the native REDcode RAW media easily. So, that’s when I’d employ a typical round-trip workflow. This is just one of many basic types of workflow.

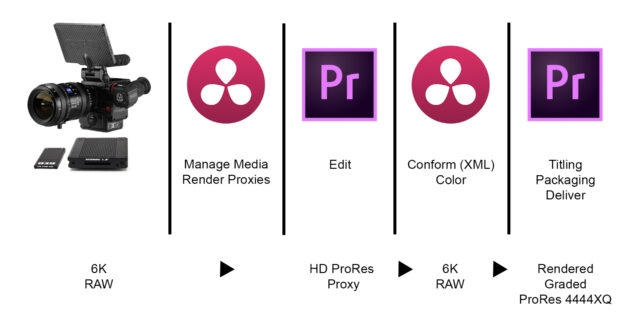
A typical “round-trip” workflow using Adobe Premiere Pro and DaVinci Resolve. Premiere could be substituted for any NLE, such as FCPX, Avid, Edius, etc.
Specifically, I’m going to edit in Adobe Premiere using compressed proxies, which are low resolution copies of the original camera media. Once the edit is locked, I will import the edit (sequence) in DaVinci Resolve using a XML file, but this time I will link back to the native REDcode RAW camera media for color grading and finishing. DaVinci Resolve may end up being my final destination as far as the picture is concerned, or I may need to take the graded picture back into Premiere for some other reason such as final titling and packaging.
Here’s a breakdown of the basic steps in this example workflow.
- Create the low resolution proxy media by transcoding all of the REDcode RAW camera media into HD Prores Proxy codec (or Avid DNxHD, or some low/medium bitrate, edit-friendly codec). This keeps the files small, but they are high enough quality to edit with.
- Edit the film.
- Export the XML and a low res video export (“cutting copy”) from Adobe Premiere.
- Import the XML into DaVinci Resolve, linking to the REDcode RAW camera media.
- Problem solve any missing or unlinked media.
- Check the sequence against the low res export (cutting copy) from Premiere.
- Color grade the film.
- Export the graded shots in a high res, high quality format with an XML from DaVinci Resolve.
- Import the XML and graded media into a new Premiere sequence for packaging and final output.
The above steps are what we would normally refer to as a round-trip editorial workflow, and it applies no matter what NLE is used. But this is only a small section of a much longer list of steps in the larger overall workflow for the project.
There are steps that take place on-set before any of this begins, and these steps define what happens to the camera cards, how they are handled, and how camera media is copied, duplicated, managed and organized. There may or may not be some on-set processing to generate graded previews for the director, typically referred to as a “dailies” workflow. You may even have access to, or create LUTS used for monitoring on set, which can be used later as a reference for color grading.
We haven’t even mentioned audio workflow yet, which weaves in and out of this overall workflow.
In conclusion
I hope this gives you an understanding of what we mean by workflow when talking about how to get started in DaVinci Resolve. There is the large and sometimes quite complex view of the entire sequence of events that happens from the second a card is pulled from the camera, all the way to exporting final deliverables, but this is always broken down into smaller more manageable sections.
The smaller sections can also be further broken down, and we’ll be doing this by taking a close look at the colorist’s specific workflow within DaVinci Resolve, the steps a colorist takes to create a balanced, matched, consistent, coherent look for a film.
In the end, this is all part of the workflow, and defining it long before cameras roll ensures consistent, quality results that meet delivery requirements and keeps all the creatives happy. It gives us a structure for problem solving, and although it sometimes needs to be modified, having a defined workflow makes everything much faster and easier to manage.


