The seventh iteration of Panasonic’s successful LUMIX GH line has arrived at the lab – the LUMIX GH7. And for the first time, this new model features a 5.7K ProRes RAW 12-bit internal recording. Are you curious to find out how this new flagship model performs? Then read on …
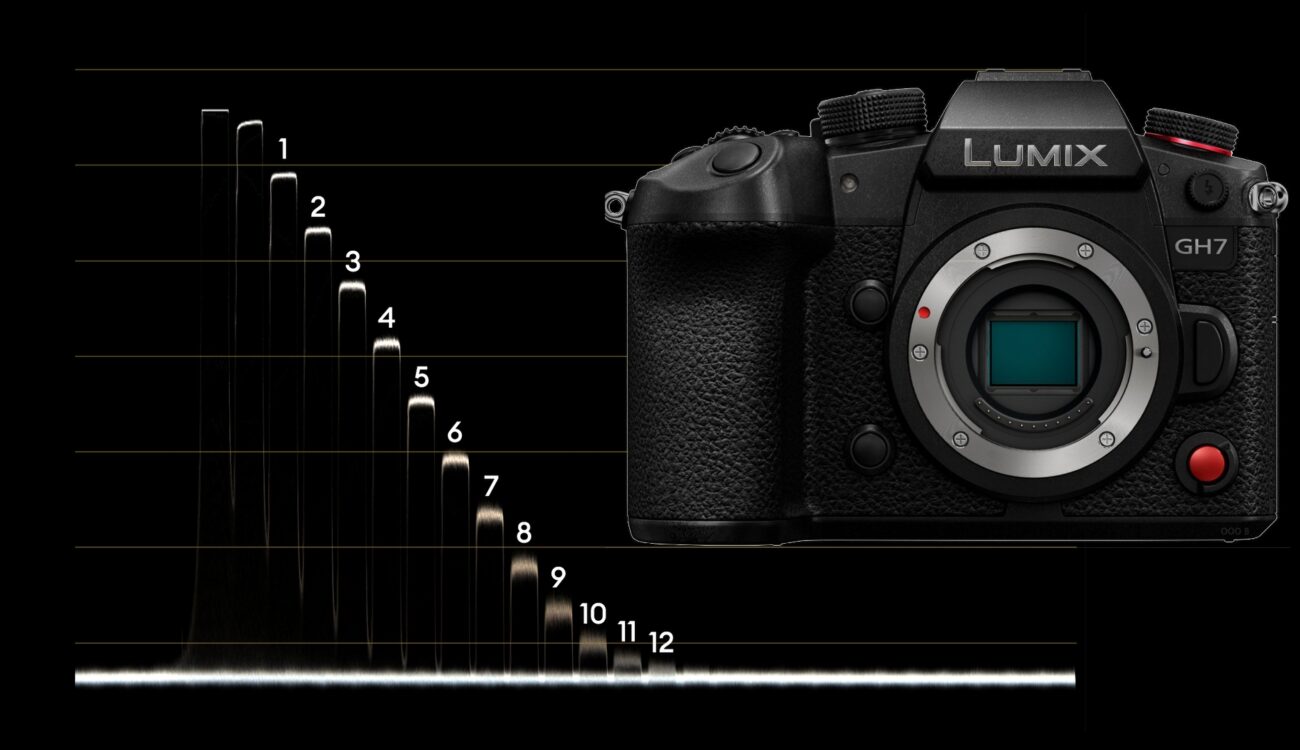
Lumix GH7 Mirrorless Camera
all prices excluding sales tax/VAT
The LUMIX GH line has always been close to my heart, as my journey with mirrorless cameras started in 2009 with the LUMIX GH1 camera. Now, I’m holding the GH7 in my hands and I wonder if Panasonic managed again to create a new milestone in the camera landscape. Not only is this model capable of recording internal 12-bit ProResRAW HQ video with its 25.2MP BSI CMOS Micro Four Thirds image sensor, but also 32-bit float audio (with the new optional DMW-XLR2 unit). By the way, if you are curious about how the predecessor GH6 and the first GH1 model perform in the lab please head over here.
Also, in case you first want to read the full GH7 specs, you can head over here, and if you missed it, don’t forget to tune in to our weekly podcast episode of Focus Check when Johnnie and Nino discuss the LUMIX GH7. (And no worries, Johnnie’s LUMIX GH7 hands-on review is in the making).
Before we get started, again a big “Thank You” to my dear colleague Florian who helped me shoot this test as well as analyze the results!
Rolling Shutter of the LUMIX GH7
Rolling shutter is measured as usual using our 300Hz strobe light, and here is the result for 5.7K as well as 4K DCI (17:9): 13.2ms (less is better). This is very similar to the predecessor, the LUMIX GH6 as well as the LUMIX G9 II.

The full 4:3 sensor scan (open gate) takes 20.8ms (5760×4320 resolution). Please head over to the CineD Camera Database for further data points.
Dynamic Range of the LUMIX GH7 at ISO500
If you do not know how we test dynamic range, please head over here for a comprehensive write-up.
Unfortunately, DaVinci Resolve 19 still does not support ProResRAW (I wonder if it ever will?), so we had to resort to the Windows RAW Convertor App to convert the files to 12bit CDNG files and then import them into DaVinci Resolve. In Resolve, we used the following development settings for the Cinema DNG files to bring them into the Panasonic V-Gamut/Log space:

Starting with 5.7K ProResRAW HQ at the new, lower base ISO of 500 (the LUMIX GH6 used ISO2000 for dynamic range boost “on” which is now the default for the GH7), we get the following waveform plot:
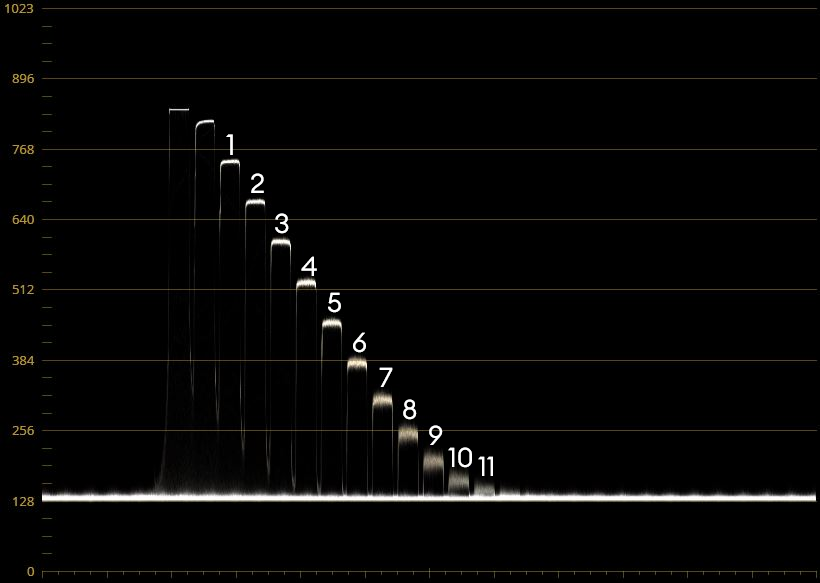
We can identify 11 stops above the noise floor, with an additional 12th and a faint 13th inside the noise floor. Now let’s look at IMATEST for the same mode:
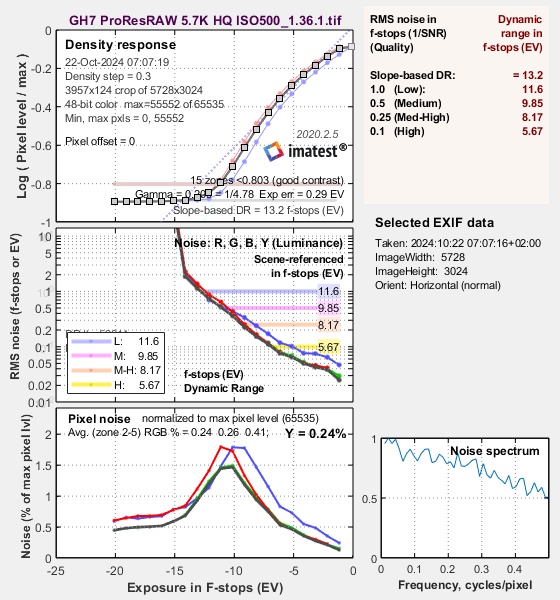
We get 9.85 stops at a signal-to-noise ratio (SNR) of 2, and 11.6 stops at SNR = 1. What can be seen in the middle graph above the blue “11.6” curve, there are additional stops identified in the noise floor. With 12-bit ProResRAW HQ, it should be possible to “excavate” those additional stops in post using noise reduction.
I would also like to draw your attention to the lower right-hand graph “Noise Spectrum” – it shows the noise spectrum with respect to the frequency or resolution. The LUMIX GH7 holds very high amplitudes up to very high resolutions (towards the right-hand side of the graph). This is: a) a clear sign of very little to no in-camera noise reduction, and b) it means that high-frequency detail is still visible (and not smeared out). This is the power of RAW, very good!
For sake of comparison, here is the waveform and IMATEST result if we switch to 5.7K 10bit ProRes HQ recording (using V-Log):


Now, we get 11.3 stops at SNR = 2 and 12.6 stops at SNR = 2. Hence, there is some in-camera noise reduction happening which can also be seen in the lower right-hand graph “Noise spectrum”: if you look at the amplitudes at higher frequencies, they drop very fast to levels below 0.4 and later to around 0.1 – hence, noise reduction smears out the higher resolution details. With ProRes RAW, this does not happen – the amplitudes never drop below 0.5 even at the highest frequencies. This also means that noise should be very finely distributed – great! Again, we can see the power of RAW here.
The CineD Database will be updated with further results soon.
Exposure Latitude of the LUMIX GH7
As written in earlier lab reports, latitude describes the capability of a camera to retain colors and details when over or underexposed and normalized back to a zero baseline exposure level in post.
In our case, we have a standard studio scene where the base exposure is (arbitrarily) set to 60% luma value on the waveform for the forehead of our talent – my dear colleague Johnnie.

Camera settings were again 5.7K ProRes RAW HQ at ISO500, again we converted the files with RAW Convertor to CDNG 12bit files and then imported them in DaVinci Resolve 19, with the same V-Log development settings as above in the Camera RAW tab. Exposure is adjusted using the exposure slider, but this only works from +4 to -4 stops. Hence, we use in addition a 3-node arrangement: on the first node is a color space transform from Panasonic V-Log to DaVinci Wide Gamut, then we have the middle node where additional adjustments are done, and then a last node again with a color space transform to bring the DaVinci Wide Gamut files back to Rec709. Any noise reduction is always done on the first, input node.
So, here is our base exposure:

Quick note – the moiré on Johnnie’s shirt is an artifact of downscaling the images to web resolution of 1920×1080, this is not present in the original footage.
Now, we expose the forehead of our talent until the red channel is at the cusp of clipping – which is at 3 stops of overexposure, then we bring it back to base. We used the ZEISS 35mm T1.5 Compact Prime for the tests. Which unfortunately is quite soft at T1.5:

Now, we close down the iris of the lens in 1-stop increments, and at T8 also double the shutter value until we reach 4 stops of underexposure, brought back to base:

At 4 stops under we have already reached the maximum exposure latitude of the predecessor model, the LUMIX GH6. Quite astonishing, the LUMIX GH7 still looks good at the same underexposure, the noise is very finely dispersed. Noise reduction would clean it up easily but let’s move on.
This is already a very good result for a Micro Four Thirds image sensor – even some consumer full frame sensors are reaching their limits at this stage (for example the Sony a7S III).
Now let’s go to 5 stops under, brought back to base:

Now the noise is much more pronounced, but still very finely distributed, and a greenish cast appears. Let’s see if we can clean this up with noise reduction in DaVinci Resolve 19:

Wow, we are at 8 stops of underexposure, brought back and the image still looks rather fine. We have to note though, that there remains a stronger color cast towards green, and faint vertical bands appear. My criterion to judge is always the shadow side of our talent’s face, and here the skin looks quite okay still.
Now let’s see if we can go to 6 stops of underexposure, and bring it back to base:

Now heavy noise is corrupting the image, and vertical lines are visible. Noise reduction will not be able to mitigate this, but let’s have a look:

As we can see, it is “game over” – the greenish cast gets stronger, and there are pronounced vertical lines that cannot be removed with noise reduction. Nevertheless, the image still looks surprisingly good considering we are at 9 stops of latitude – also the shadow side of Johnnie’s face is still somewhat intact! Let’s not forget that we are looking at a Micro Four Thirds sensor here! At 8 stops of exposure latitude, most of the recent consumer full-frame cameras are reaching their limits.
Of course, we have the RED RAPTOR [X] which can handle 9 stops of exposure latitude, or the ARRI Mini LF which goes to 10 stops. And let’s not forget the ARRI ALEXA 35 which can handle 12 stops of exposure latitude, to give you our current benchmark.
Summary
Panasonic did it again – the LUMIX GH7 is in a class of its own considering the Micro Four Thirds sensor size! Not only does it show good rolling shutter values, also the dynamic range results don’t disappoint. They are quite similar to the recently tested Sony A9 III or the Canon EOS R5 C for example. As mentioned, it plays in the league of recent consumer full-frame cameras with those results (a bit on the lower end though).
The exposure latitude tests again reveal the power of 12-bit RAW images – we can push this little camera to 8 stops of latitude, with some room towards 9! This is at least one stop better than the predecessor LUMIX GH6 which only offered 10-bit ProRes HQ internally and also one stop better than the full frame Canon R5 C or Sony a7S III for example which exhibited 7 stops of exposure latitude.
Now I can’t help but imagine what would happen if Panasonic managed to bring the “dynamic range boost” technology and ProRes RAW internal recording to their full frame cameras in the form of an S1/S1H Mark II. Okay, I will dream on …
Have you used the Panasonic LUMIX GH7 already? Do you like shooting on Micro Four Thirds sensors? Let us know in the comments below!